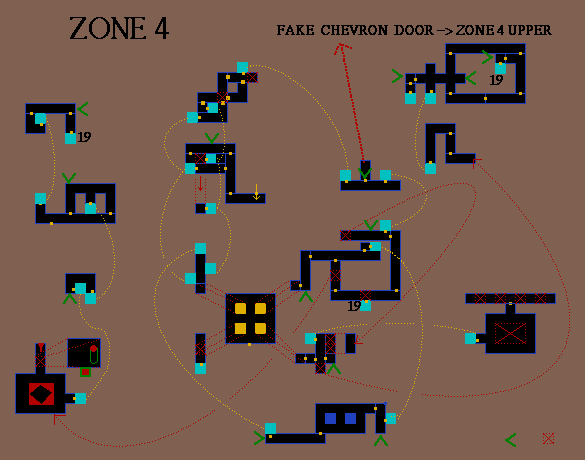
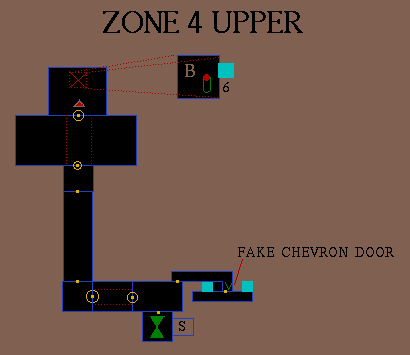
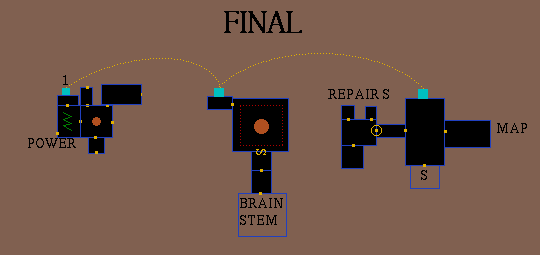
This walkthrough gives full details for achieving the primary objective of the game: Neutralizing the brainstem computer which controls the complex. The manual says, "Failing that, the operator should seek to dismantle the force wall that shields the complex, so that additional forces can be admitted to achieve the primary objective". Unfortunately, I have been unable to figure out how to do this, so you're on your own there.
Obtain four additional codes for the sonic key, in this order: green square, green triangle, green circle, green hourglass. These allow progressive access to the four main zones in the complex. Each zone contains one code, and also contains one wall safe. The safes contain the four parts of a mysterious cube... There are three fusion generators supplying power to the complex. The schematic map opposite the REPAIRS AND SPARES room will tell you which ones are on. Initally, only the centre one is on, and you'll need to activate the other two with the sonic key to be able to use certain elevators.
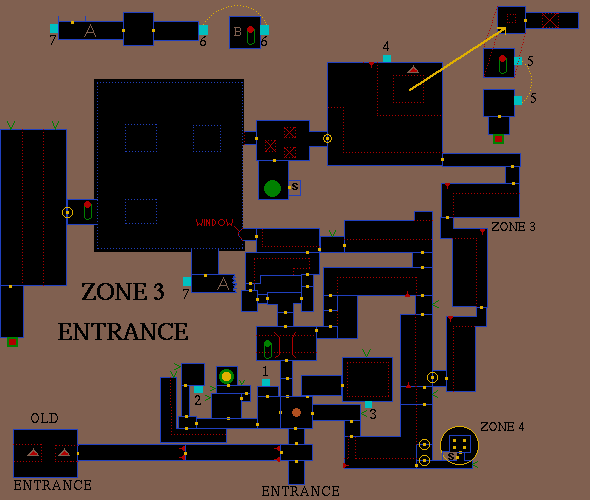
Save the game whenever you can, and keep a backup save, preferably from back at the save console near the Centron room. Sometimes you can find a most unfavourable combination of robots waiting for you as you emerge from a save room and try to fight your way back out of a zone, and you might wish to fall back to your original save and repeat the zone. I haven't generally bothered telling you when and where to save in the walk through, but the maps reveal locations of save rooms. A useful configuration to have saved on the function keys is MAX JUMP. All systems except the power-assist off-line (including sensors), and all energy banks charged and on-line. This channels maximum power to the power-assist, and there are a couple of very long jumps you have to make. Also use this when you fall long distances to minimize damage when you hit bottom. You may find that when you drop items you've picked up, such as energy banks, fuel pellets (red spheres) or shield generators, they may explode in your face, causing much hurtful damage and a great deal of irritation. Especially if you haven't saved the game recently. I _think_ this happens when you get shot and damaged badly, causing incidental damage to the items, and if they've got a lot of charge in them, the blast can easily kill you. The only solution is to have all systems off-line except the shield, and all energy banks charged and on-line before dropping the offending item. Even then, you may still die. Swear, re-load a saved game and try again.
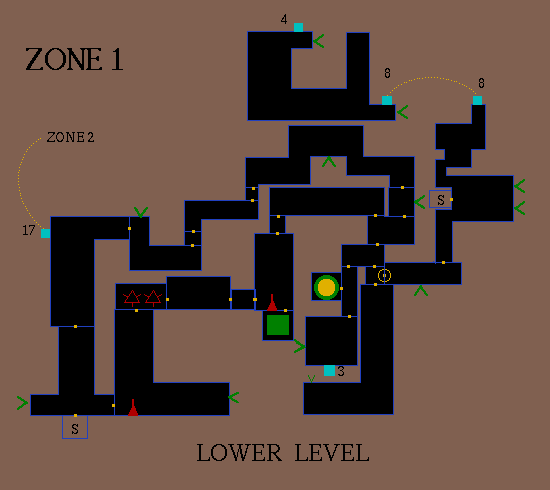
North through the entrance door,N,N into Centron room,W,N, take elevator to top floor, pick up energy bank, W, pick up parrot camera, E, E, goggle at schematic map, W, S, save game. ZONE 1: Take elevator to bottom , S, activate energy transfer probe, all banks on-line, cozy up to the green sphere and recharge. E to Centron room, NE, E, take elevator down to ZONE 1. Get your guns on and start blowing robots up. Collect a few energy banks to give yourself a total of six if you can, and use the ETP on the red spheres to charge your on-line banks up. You can also make the spheres explode while they're lying on the floor, killing nearby robots. The sonic code for doing this is a RED CIRCLE, and all spheres in the room will go. Head N, W into the generator room. Switch generator on, E, N, take the right-hand N exit, N, head all the way W through this room and go S, S, S, S, W, ignore the elevator, S, and S to save game. Switch on shield and all energy banks, E, IMMEDIATELY head through the N door (there's a very large fixed cannon shooting at you from the S wall), blast the two pyramid guns, E,E,E and IMMEDIATELY head for the S door to avoid the fixed cannon in this room. Get the GREEN SQUARE code by interrogating the weird machine with the sonic key. Reverse your entire route back to the elevator you came down in, and you can now take it back up. Head back to the green sphere and recharge your banks. Head upstairs, SAVE GAME FIRST, then dump your three charged banks. Drop the empty ones you should have gathered and pick them up again to gain empty on-line banks. Pick up your charged spares, save game, head downstairs and charge up at the green sphere.
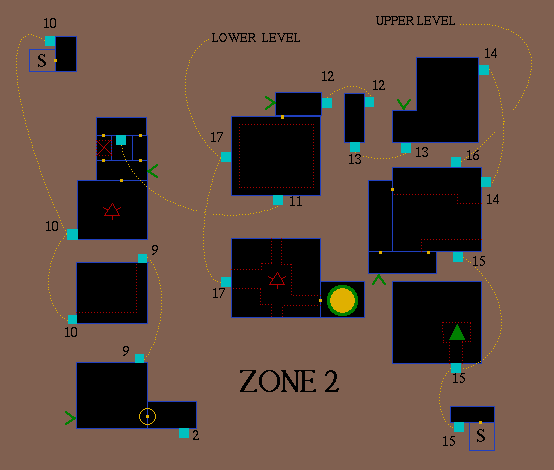
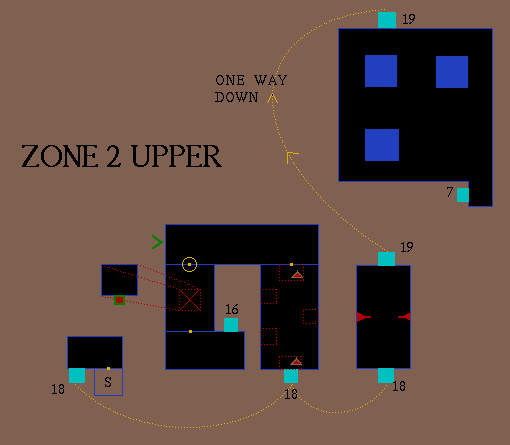
From the green sphere, W,W,N,N, elevator up,unlock W door with sonic key, W, elevator up, walk round ledge to SW corner, elevator up to middle floor. (N.B. If you see the elevator arrow lit up, this may mean that there's a robot on its way to meet you. Have your shields up and gun on-line when you open the elevator door!) Blast pyramid gun, N, right-hand N door, N, elevator down. Take elevator on W wall up, blast pyramid gun, E, activate generator, W, elevator back down to middle floor. N, elevator up, open window in E wall with sonic key and drop jaw at sight of robot in room below. You need to call and take the elevator in the NE corner of that room, so wait until he's out of that general area, take elevator at S end of corridor down, sprint across room and call elevator. If you run around a bit, the angel robot will find it hard to hit you. Once you've been shot once by this dude, you will appreciate this feature. Elevator up, W,S,right-hand N door, elevator up to middle floor, collect GREEN TRIANGLE. Reverse route back to save game near Centron room. Sounds easy when you say it all in one sentence like that, eh? You may have problems getting back into the angel robot's room. If he's standing guard outside the elevator door when you reach bottom, don't try to squeeze past him. Go back up, switch to MAX JUMP and simply drop off the edge to land, somewhat dazed, in his room. When you get back to the start save room, go W, and unlock the door to the SPARES AND REPAIRS area. If you stand in one of the cubicles on the N wall and trigger the wall switch with the sonic key, you should find your energy recharged and all systems fully repaired. Enter the S room, jump up onto the ledge, and pick up the red tube (missile launcher!) Use this by selecting the slot below the gun and selecting a red fuel pellet on your backpack display. Press fire to blow things away, but make sure you're not standing too close to the target.
There's really two ways to do this, but I only discovered the easy route after many, many hard battles in the other route. Take elevator down to ZONE 1. N, take the right-hand S door, unlock the E door, N, follow the corridor all the way N past a save room to the elevator. Elevator down, go west into the large room, then head NW round the corner to the elevator. Take elevator to middle floor, set up shields and missile launcher, blast the auto-cannon (mounted on wall immediately to the W of elevator) with a missile. Drop down pit, open concealed pit in middle of floor (three purple hourglasses), drop down. Take elevator down, S, open wall safe, pick up red and green component. N, elevator up, MAX JUMP, jump out of pit, jump out of second pit back to near elevator. Head to SW corner and line up on the ledge to the W by the big red door. With MAX JUMP you should _just_ make it to this ledge. I'm not sure the programmers intended this to be manageable, as it neatly bypasses an enormously difficult section, absolutely stuffed with auto-cannons and robot tanks. (For the masochistic amongst you, go NW from the Centron room, N,N, close pneumatic bridge, E,N,N,N, take right-hand S exit,S, unlock E door, E,E,N,N,N,N,W. Destroying four auto-cannons with the missile launcher en-route. Coming back is even worse!) Unlock the W door, W, shoot out the small guns and avoid the three concealed pits in the floor. If you hear the hum of an opening door beneath your feet, jump forward or back immediately! S, pick up GREEN TRIANGLE, N, W to the ledge above a huge pit containing three giant pillars. MAX JUMP, jump W to land on top of the nearest pillar. If you hit your head on the ceiling of the ledge room, then you weren't close enought to the edge when you jumped. From the first pillar, jump W, then S, then W to the ledge in the SW corner of the room. Unlock door, W, MAX JUMP, then leap W over the trench, trying not to land on top of any of the numerous tanks patrolling this room. Sprint for the S door, open the safe and take the second component. This is a good time to switch your energy banks. And Now..... Retrace your steps to save game near the Centron room.
Charge up your energy, E from the Centron room, S,S, blast gun, E, head N at the E end of the corridor, N into a room with four purple squares on the floor. Stand in the middle of the NE one and unlock it with the sonic key. Drop down, E, head N,E,S, set up shields and missile launcher, drop down pit to the South. Face N and blast the auto-cannon. Walk up towards it and unlock the concealed pit in the floor. Drop down, open safe, take third component, MAX JUMP out of pit, take elevator up. Follow corridor round to next elevator and take it up. Walk N out of elevator, W, S, W and N to the next elevator at the end of corridor. Elevator up, follow corridor round to the E, and take door S to elevator. Take elevator down to middle floor, and jump NE over pit to land on E side. Follow corridor round to the N and take the elevator on the N wall up. Head W and walk through the yellow and green chevronned door on the N wall. Drop down the pit to the W, head W,S,S. Pick up GREEN HOURGLASS code, N,unlock door, W, unlock door, W,N,N, unlock door, N, walk to N end of bridge, set up shields and missile launcher, drop off bridge to room below, blast auto-cannon, take the western S exit,S,S,S,W. Close pneumatic bridge by interrogating the pillar console with sonic key, S,S,S to Centron room and save game.
For this you need to head back into Zone 2 with at least two missiles in your possession. Go to the room with the large angel robot as before, elevator up, take the elevator on the N wall up. Set up shields and missile launcher and open N door. You thought the big angel downstairs was bad news? Blast the "Lucifer" robot (takes two missiles) and wait for it to stop twitching. Find the concealed pit in the floor - should be at the feet of the robot, unlock it, drop down, open safe, take fourth component. Back to save game near Centron room.
Head to SPARES AND REPAIRS. Drop the four components on the floor of a cubicle and watch them self-assemble. Pick up the assembled cube and dump the missile launcher. Slot 2 should now be... a BLUE sonic key! E,E, take elevator to middle floor, E. Jump onto top of Centron pillar. Trigger blue sonic key sequence SQUARE-CIRCLE-TRIANGLE, and wait for the special effects to die down. If you're standing anywhere but on top of the pillar, you'll die. Look at the S wall. See that glowing blue outline? That's a secret door, that is. Jump over to it, unlock it and S,S,S to the Brainstem computer room. Shoot the brainstem sphere lots of times until it blows up and sheds most of its mass to leave a much smaller sphere, which promptly does a runner. You can't harm it now, so simply move under the opened door in the ceiling, tilt your head up and just watch...